|
|
|
|
|
6.6. Recovering DVD video and photos |
Top Previous Next |
|
6.6.1. Hardware requirements.
6.6.2. Searching and recovering the lost data. CDRoller Wizard interface is designed for novice users and allows to recover DVD videos and photos off the discs, created by standalone devices (camcorders, personal DVD recorders), using the simple "step by step" procedure. To display the Wizard dialog, just select the Recover DVD Video option from the File Menu.
Every Wizard dialog contains a brief instructions, describing a possible user actions in order to achieve the best results in DVD data recovery.
At the 1st step, please select your computer DVD drive.
At the 2nd step, just insert your DVD and click the Next button.
At the 3rd step, please select DVD video recorder (camcorder or standalone dvd recorder) that placed a video or/and photos on your disc. You can use Any recorder setting and try to scan each of displayed tracks, starting on the track with the highest length.
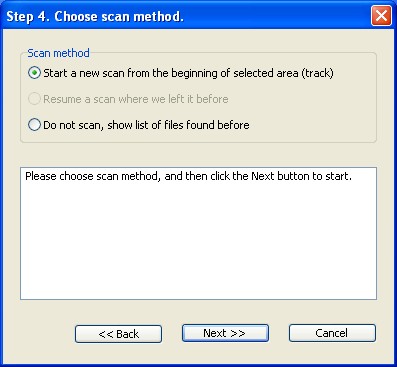
At the 4th step, just click the Next button if you scan the selected area for the first time.
At the next step, you should see a dialog similar to the one shown here.
Finally, just recover the found video (VOB files). You can also try to scan another track, shown at the 3rd step.
Note. If your mini DVD+RW was re-formatted by camcorder, an additional test is required in order to determine whether the lost video is now accessible or not. For inquiry, please contact us at support@cdroller.com
6.6.3 Using UDF Reader.
6.6.3.1 Recovering VRO files. You can usually see these video files on the DVD with UDF 2.0 file system. When your dvd recorder or camera writes a video according to DVD-VR standard. If you see UDF 2.0 under File System column in the CDRoller window, try to browse the disc folders, find and recover VRO file directly. Please keep in mind VRO files are often fragmented. If one fragment is seriously damaged or incorrectly recorded by the camera, this can stop all recovery process. A solution is to recover each fragment of video (file extent) separately. Details ...
6.6.3.2 Recovering AVCHD video.
6.6.4 Viewing VOB files. To view the recovered VOB files, we recommend PowerDVD from CyberLink at www.cyberlink.com.
6.6.5 Converting VOBs into MPGs. Our Split video option automatically converts a "raw" DVD-video data (VOB or VRO files) into MPG files without loss of quality. In contrast to VOB file, MPG file can be simply viewed with the help of any DVD-compatible software (player). To activate the Split video window, just click Split Video button in the Side Bar (a left panel of 'Step 6...' dialog mentioned above) and assign the recovered file name in the next dialog. Or, just click Split Video button in the Main ToolBar.
6.6.6. Making a new DVD with recovered video. Just click Burn button in the Main ToolBar, select Make a new DVD with recovered video and click the Next button.
Further, using a simple "step by step" procedure, you select DVD burner (computer DVD drive), add a video (MPG files) into your compilation and, finally, burn a new DVD-video disc that can be played back in the most DVD players.
In addition, you can load the recovered MPG or VOB files into your DVD-authoring software, for example: Sony Picture Motion Browser, Windows Vista / 7 DVD Maker, Sonic MyDVD, Nero Vision, etc.
Note. To replicate successfully finalized DVD-video disc, you can extract ISO Image file first, and then burn it to a new (blank) DVD. |
|
|
|
|
|